How To Install a Water Softener for Your Home – Griggs Homes
How To Install a Water Softener for Your Home
Many people choose to install a water softener into their home in order to remove the minerals from hard water. These minerals – magnesium and calcium – can cause a build up in your home’s pipes and faucets.
It’s important to install a water softener in a suitable location, and to stick to the guidelines in the manual of your chosen water softener.
Key Points for Installing a Water Softener
- Turn off your water supply at the mains
- Drain your water lines
- Ensure you make proper connections
- Fill the brine tank half-full with salt
- Ensure the bypass is shut, then slowly turn off water and check for leaks
- Complete the start-up procedure
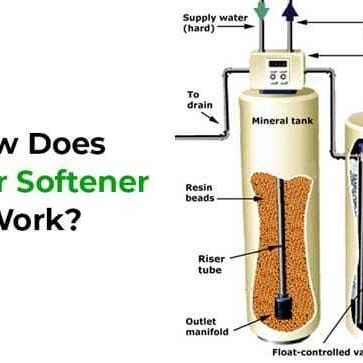
What is a Water Softener?
A water softener is an appliance that removes the calcium and magnesium minerals from your water, caused by hard water. This is achieved through a process called ion exchange.
Why Should I Install a Water Softener in My Home?
A water softener removes the minerals from hard water. This helps to make your home’s water kinder to your appliances and pipes, as well as yourselves.
Hard water has lots of minerals, and can do a fair amount of damage. It can cause a buildup in pipes and faucets, reduce the cleaning power of detergent, and stain sinks.
Hard water that is heated causes a scale of calcium and magnesium minerals to build up. This can contribute to the inefficient operation or failure of water-using appliances. Pipes in the home can become clogged with this scale. If this happens, water flow is reduced, and a pipe replacement will eventually be needed.
Where Should I Install a Water Softener?
If your home has an old water softener that you are looking to replace, you should try to install the new water softener in the same location as the old one. However, if you’re installing a water softener for the first time in your home, here’s a few tips to help you find the best place to install your water softener.
General Location
It’s a good idea to install your water softener in a location that is out of the way, but still easily accessible. Oftentimes this is near the water heater in a basement, utility room, or garage. You should make sure you allow enough space around the water softener for maintenance.
It’s important to avoid putting the water softener in a place where freezing can occur – this can cause permanent damage to your water softener and void your warranty. It’s also important to avoid direct sunlight, so don’t put your water softener outside!
Required Hookups
Your water softener will need to be hooked up to a drain such as a floor drain or utility sink. Also, your water softener will need a nearby electrical receptacle (not controlled by a switch) that can handle the needed amperage. It’s important to check the manufacturer’s specifications on your water softener here.
Where to Connect Pipes
If you’re looking to soften the water supply of your entire home, then you should install the water softener before the water heater. This also has the added benefit of reducing the sediment buildup in your water heater.
In households where sodium in the drinking water could cause a health risk, it may be necessary to bypass certain faucets in your home used for drinking water, such as the kitchen sink. You could also be required to soften only the hot water side of your water supply system. However, if you choose the latter, none of the water in your cold water system will be softened.
How To Plumb a Water Softener
If you’re looking to do this DIY style, here’s the main steps you need to follow in order to install a water softener in your home.
- Clear and sweep the area where you intend to install your water softener.
- Shut off the water supply to your house.
- Cut into the water supply line using a pipe cutter, and install elbow fittings.
- Cut and install the pipes that lead to the bypass valve.
- Clamp the drain hose to the softener and run it to a utility sink or drain.
- Connect the brine tank’s overflow tube.
- Set the bypass valve to the ‘bypass position and turn on the water for a few minutes.
- Set the valve to the ‘backwash’ position after plugging the unit into a receptacle
- Partially open the inlet control on the bypass valve.
- Plug in the power cord again.